Designing a DIY, frost-protected, insulated, monolithic slab
A building's foundation provides a solid, stable surface for the building to sit on. The foundation for my shed/workshop needs to support an 8'3" wide by 12'6" long building with an average grade-to-roof height of 10'8" (grade is a fancy builder word for ground level). It also needs to be strong enough to carry the weight of various tools and wood.
What type of foundation?
I'm going with a concrete slab.
A concrete foundation is what most houses and buildings across America are built on. It's solid, sturdy, and has plenty of strength for my shed/workshop. The slab can be used as a finished floor and maximizes vertical interior space by avoiding the extra height of joists. Since its solid concrete, there's no space for critters to make a home below it.
The biggest downsides are the lack of moveability and the slightly higher cost (compared to an option like skids on a gravel pad).
A Frost Protected Shallow Foundation (FPSF)
Within the concrete slab category are even more options: monolithic slabs, slabs with frostwalls, and raft slabs. If you want to learn more about each, this article on insulated slabs at GreenBuildingAdvisor is a great place to start.
I opted for a Frost Protected Monolithic Slab. This type of slab is great for my small shed because it requires less digging and less concrete than a standard slab footing (which must extend below Virginia's frost depth of 18").
On to the design
Building codes exist for a reason. To build a good foundation, I'm following guidelines set forth in the IRC, the International Residential Code. The IRC "comprises all building, plumbing, mechanical, fuel gas and electrical requirements for one- and two-family dwellings and townhouses up to three stories."
Different states follow different versions of the IRC. As of this writing, Virginia follows an state-specific version of the 2021 IRC called the 2021 VARC.
Footer Size
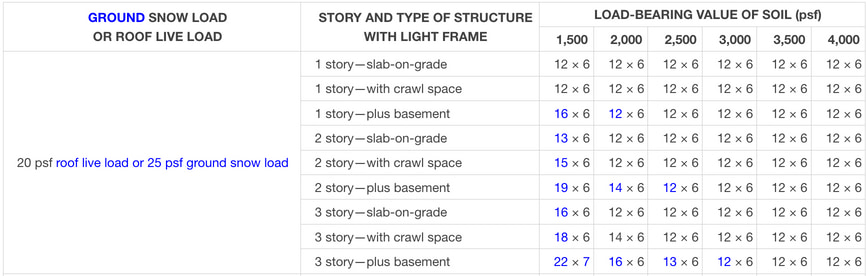
The VARC supplies a handy chart to determine the minimum width and thickness for a foundation's footers. A wider footer offers more bearing capacity (it holds more weight). But, a wider footer also means more digging and more concrete. The relevant characteristics for this build are:
- Building Height: 1-story
- Type of Building: light-frame structure
- Roof live load: 20psf
- Foundation type: slab-on-grade
- Soil bearing capacity (how much weight the soil can hold): 1500 psf
The minimum, code-compliant size for the slab's thickened edge is 12" wide by 6" deep. This size footing can accomodate up to a 70 psf roof live load for a 1-story building and a 30 psf live load for a 2-story building. If I wanted to build a 2-story building with a 50 psf roof live load, the footing size would need to be increased to 14" wide by 6" deep.
For my shed's footing I will use a 12" wide by 12" deep thickened edge. This should give the building plenty of bearing capacity and complies with the minimum depth requirements specified in R403.1.4.
Anchorage
Section R403.1.6 details foundation anchorage requirements. We'll come back to that in the framing plan since I plan to use post-installed, code-compliant Titen HD concrete screws.
Foundation Reinforcement
Still reading? The next phase is figuring out the reinforcement provided to the slab.
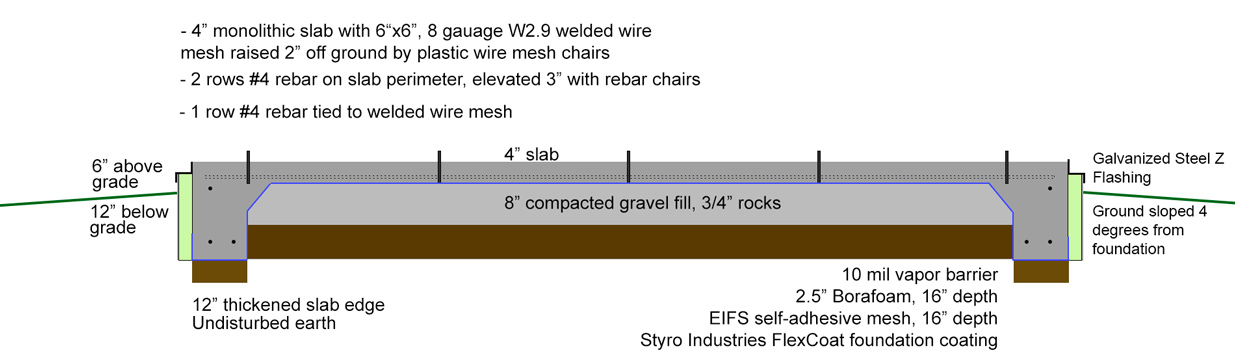
The VARC has special requirements for buildings in seismic categories D0, D1, and D2, but my shed is in seismic category B, so those requirements don't apply. I'm still going to follow them though; I'm including two #4 bars at the bottom of the footing and one #4 bar at the top of the footing. I'll also use welded wire mesh over the slab for extra crack protection, as well as residential fiber added to the mix.
Rebar placement
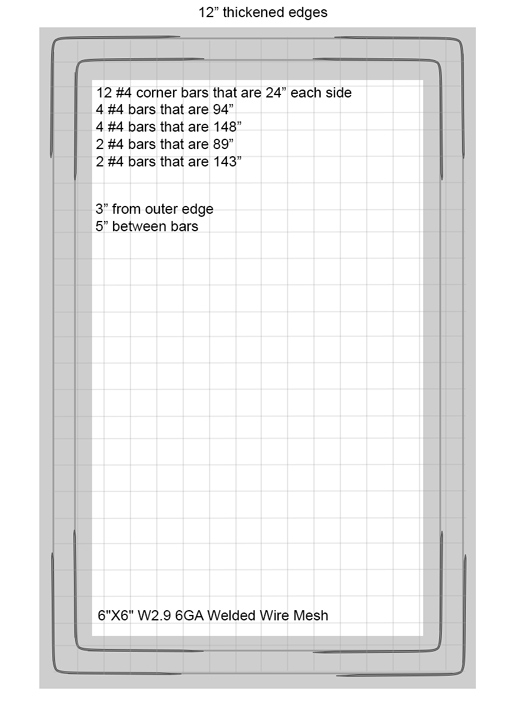
When working with steel rebar, it's important to provide enough cover to protect the bar from corrosion (steel rebar doesn't like water). To do this, I'll elevate the footing bars 3" by using Hercules 2-bar footer stands. The stands will be placed so that there is 3" of cover on the sides of the rebar as well. The welded wire mesh will be elevated using 2" steel mesh chairs. Both rebar and welded wire mesh will be secured using steel rebar ties.
Frost Protection
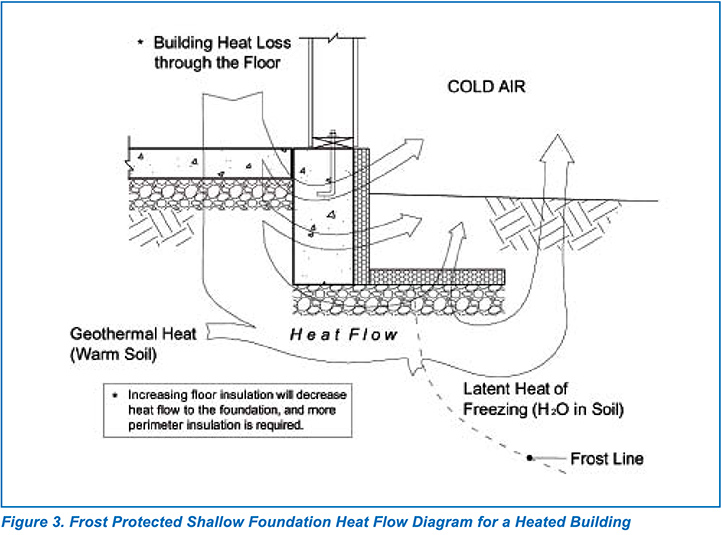
Remember earlier when I talked about a frost-protected shallow foundation. Here's where I explain it.
The IRC allows shallower footings for slabs which use insulation to protect the ground below them from the freeze-thaw cycle (which can cause cracking in slabs). Since this will be a conditioned shed, I can use the requirements for buildings with a monthly mean temperature > 64 degrees Fahrenheit.
Per Table R403.3(1), for a location with < 1500 degree Fahrenheit days, the foundation must have:
- a minimum footing depth of 12"
- vertical insulation with an R value > 4.5
I'll be using 2.5" of Bora-Foam, a closed cell polystyrene foam insulation board formulated for termite resistance. Their website states it has been evaluated for below-grade use by the ICC ES and meets ICC ES AC239 requirements. The manufacturer states R10, but the IRC gives below-grade EPS slightly lower R values of 3.2 per inch, which would be R8 and still well above the required R4.5.
Slab insulation
According to Table N1102.1.2, a slab must have a minimum of R10 slab edge insulation extending 2 feet below grade to meet energy requirements. However, since this is a small structure, it does not fall under the IRC requirements in my locality. R8 is close enough for me for a building that will have minimal heating/cooling requirements already.
Insulation Protection
To add an extra layer of protection to the foam (for mitigating bugs, moisture, and damage), I'll be applying Styro Industries FlexCoat over self-adhesive fiberglass mesh. This coating will be applied to all of the outside faces of the foam.
Over the foam's top face, I'll use galvanized steel Z flashing. This will divert water away and help protect the foam from bugs.
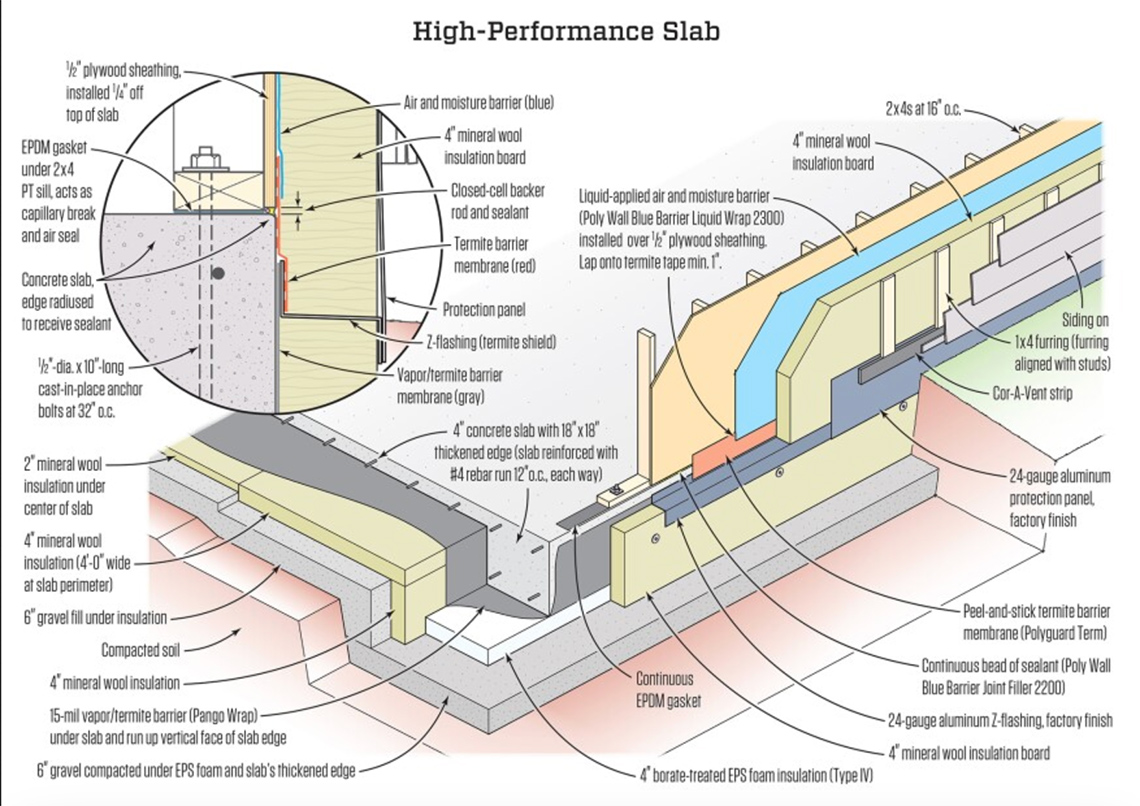
The Z flashing will be covered by a Polyguard Termite Barrier which extends up the sheathing, much like the detail in the image below. This serves as additional termite resistance.
Next step: Site prep and form layout
The next steps are to prepare the site, lay out forms, and get everything ready for the pour. Stay tuned for further updates once site prep and form layout is complete.