Continuous Rockwool Exterior Insulation
Keeping the cold out in the winter and the heat out in the summer is a problem humans have faced for thousands of years.
Over time, we've developed some pretty sophisticated building methods to do so: passive solar design, convective cooling, thermal mass, ventilation, and various insulation strategies. This post focuses on the insulation aspect and why I chose to use continuous exterior insulation.
Why not just insulate the stud bays and be done with it?
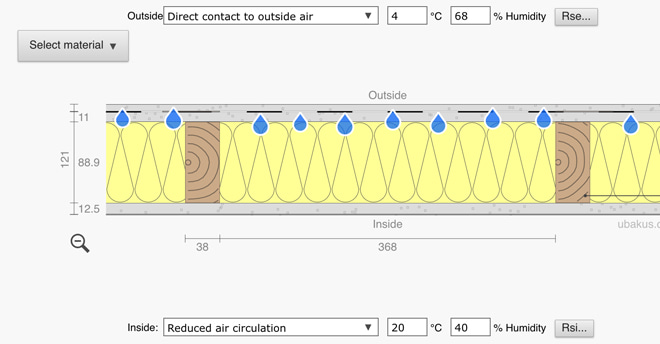
Image credit: ubakus.de
The traditional way to insulate a building in America is to put fiberglass batts or mineral wool batts between stud bays. It's cheap and easy, but it doesn't always work well.
Outward Moisture Drive Issues

Image credit: ubakus.de
If the drywall isn't perfectly air-sealed (as most drywall installations aren't), walls can see outward moisture drive through air leakage during the winter. With the traditional insulation method, this moisture condenses on the back of the cold sheathing, forming frost. This frost can cause leaks and rot when it thaws during warmer periods.
Thermal Bridging
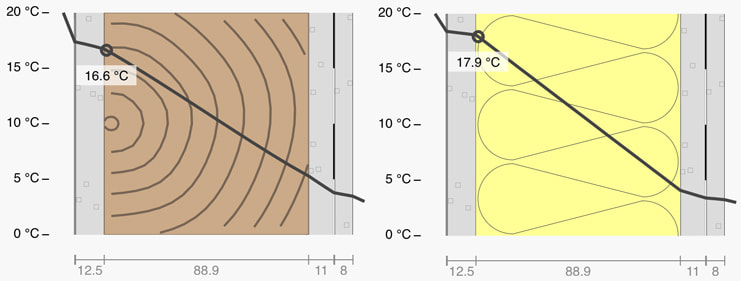
Image credit: ubakus.de
Thermal bridging is another reason insulation between stud bays doesn't work as well as the package states. Even though the insulation might perform well at resisting heat exchange through the wall, it gets undercut by a more thermally conductive material: the studs.
Skip to Exterior Insulation if you don't care for math.
In my shed/workshop, there are 2x4 studs at ~16" OC. This means that for every 14.5" of stud bay (90.7% of the wall), there is 1.5" of stud (9.3% of the wall). The stud bay has an R value of R15. Wood has about R1 per inch, so the studs have an R value of R3.5.
Heat loss through a building is measured by the number of BTUs which will pass through a square foot of area (U value) per degree temperature differential between the inside of the building and the outside, per hour. The U value is equal to 1 / R.
So we have 9.3% of the wall at R3.5 and 90.7% of the wall at R15. Let's say it's winter and it's 30 degrees outside. The thermostat is set to 68 degrees inside. For 100 sq ft of wall, the room will lose (9.3 * (1/3.5) + 90.7 * (1/15)) * (68-30) = 331 BTUs per hour. For 400 sq ft of wall, it would be ~1300 BTUs. Note that 1/3 of the heat loss (2.66 BTUs per degree temperature differential) is through the studs, despite them only being 9% of the area in our calculation. In a real-world scenario, there will be even more stud area due to top plates, blocking, and the bottom plate.
Enter exterior insulation
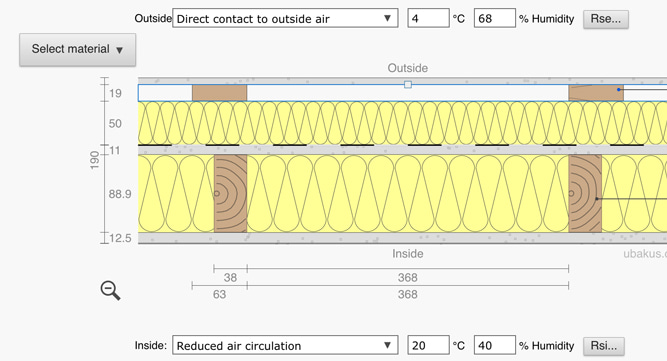
Image credit: ubakus.de
Exterior insulation aims to solve the moisture drive problem and the thermal bridging issue. It adds a layer of insulation to the outside of the sheathing. This keeps the sheathing warm, preventing that pesky condensation we talked about earlier. No condensation = no leaks = no rot and mold. Since the exterior insulation covers the entire wall, studs and all, it also helps prevent thermal bridging.
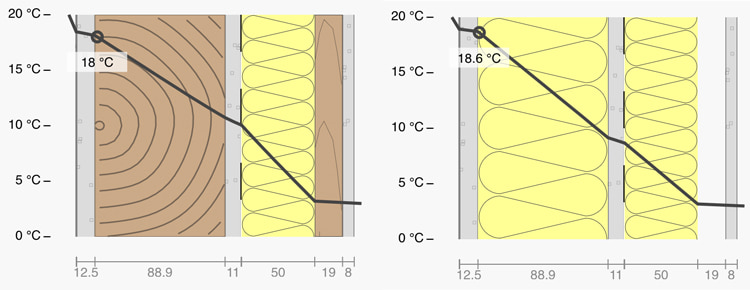
Image credit: ubakus.de
Nice and toasty.
Picking the Insulation
Options for external insulation range from plastics like Expanded Polystyrene foam (EPS), Extruded Polystyrene foam (XPS), and Polyisocyanurate foam (Polyiso) to more natural materials like expanded cork, mineral wool, and wood fiber. The pros and cons of each material would be a whole post in itself, so I'm going to focus on the one I picked: mineral wool.
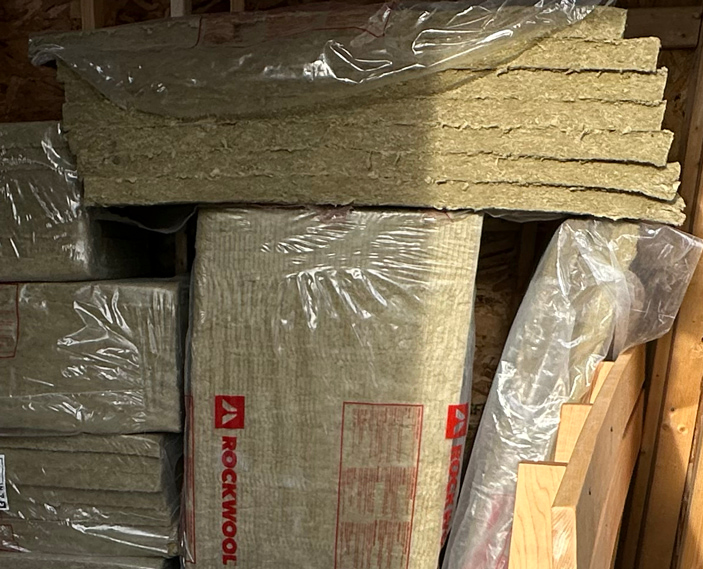
Mineral wool is made by melting basalt rock and steel slag (a byproduct of steel production) at 2700 degree F temperatures and spinning them into a cotton-candy-like wool product. This is then pressed into rolls and sheets of varying densities.
Exterior insulation tends to be more dense than interior batts. This extra density helps resist compression when installing furring strips and siding over it. Comfortboard 80 is the usual recommendation, but it was sold out everywhere near me, so I went with the next best thing in stock, a product called ProRox SL 960. It has an R value of 4.2/inch, a nominal density of 6.24 psf, Flame Spread 0 / Smoke Development 0 per ASTM E84 (UL 723), a compressive strength of 167 psf, and ASTM C612 Type IVB compliance.
Pros
- Since it's just rocks, it is unharmed by moisture
- It doesn't provide any food sources for mold
- It's fire-resistant (melting point of 2150 F)
- It's vapor-open (so it can dry out). This also means it doesn't need to be taped and treated as the primary weather-resistant barrier (WRB) of the wall like rigid foam boards would. This made more sense to me since I was using the Zip sheathing as the WRB.
- It's heavier than other insulation, making it a great sound insulator.
Cons
- Rockwool uses a formaldehyde binder, which they state is cured at very high temperatures during manufacturing, leaving only trace amounts. I personally think it is fine for my shed/workshop, and COMFORTBATT has Greenguard Gold status, but it is worth noting when there are many insulations out there which have switched away from formaldehyde binders.
- Costwise, Rockwool is more expensive than EPS (reclaimed or otherwise). Mine cost me around $1.46 / sq ft while EPS can be found for as low as be $1.16 / sq ft.
- The ProRox SL 960 product I ended up going with is a lower density than Comfortboard 80, meaning I had to install more fasteners to try to reduce waviness and long-term movement.
- Since ProRox SL 960 is meant to be an industrial product, it is tested against industrial uses, not residential ones. Looking back, I should have waited for Comfortboard 80 to come back in stock, but for the purposes of my tiny shed/workshop, it worked out alright.
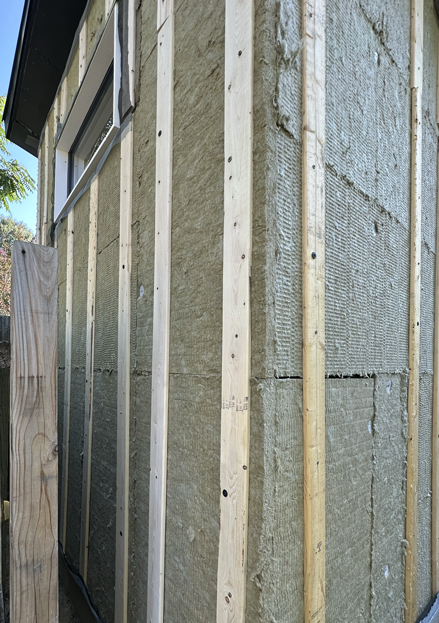
Installing the Rockwool Exterior Insulation
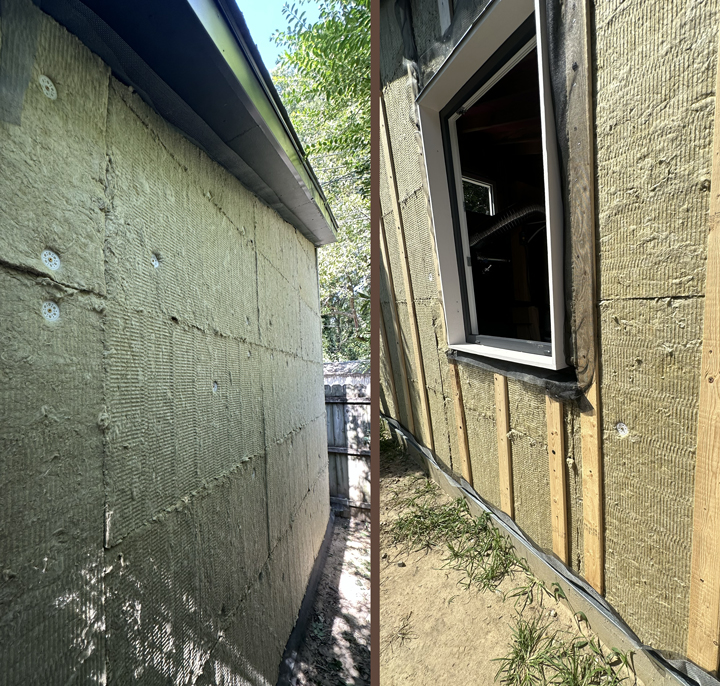
Rockwool comes in 2'x4' boards and can be easily cut with a bread knife. I went with a two-pronged approach for attachment to the sheathing:
- Two 2.5" or 3" screws coupled with plastic washers to initially hold the boards to the wall.
- A 1x4 or 1x3 furring strip at every stud to provide a rain screen system, allowing any water that gets behind the sheathing to drain, and backing for siding. I used non-treated furring since I expect the roof overhangs and siding to protect them from the brunt of rainwater.
The washer installation was straight-forward, but the furring required careful preparation to ensure I hit the studs. The screws I used were 5" long. This ensured I got at least 1.5" of penetration into the stud (technically 1.75"). I used a mix of #10, #12, and 1/4" screws based on what was most affordable. I tried to use at least one #12 and one 1/4" per furring for extra holding power over time.
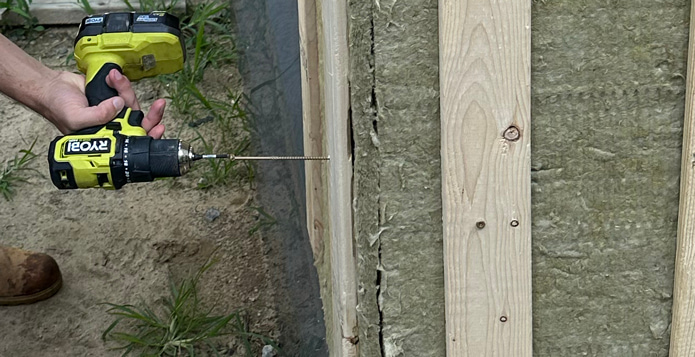
The trickiest screws to drive were the starter screws. I ended up pre-drilling those through the furring before attempting to drive them into the studs. This helped get a proper 90 degree angle and also resulted into less compression to the insulation.
Up next
Next I go over the insect screen around the exterior insulation, the window detailing, and getting everything ready for siding. Technically, those first two parts came before the exterior insulation, but I wanted to split the posts up because this one is already getting rather long.